
Scaling an Image
From the Image Events scripting dictionary:
scale v : Scale an image
scale (reference): the object for the command
[by factor (real)]: scale using a scaling factor
[to size (integer)]: scale using a maximum width/length
Scaling an image will proportionally increase or decrease the dimensions of an image.
The scaling process will not change the resolution of an image. In other words, an image with a resolution of 72 DPI, scaled to 50% of its current dimensions, will still have a resolution of 72 DPI. An image with a resolution of 300 DPI, scaled to 200% of its current dimensions, will still have a resolution of 300 DPI.
The scale command must include one of two parameters indicating the method used to calculate the scale and the amount of scaling to apply:
- If you choose to scale the image based on a percentage of its current dimensions, the value you provide for the by factor parameter is a number indicating the percentage of scaling to apply. The value 1 is equivalent to 100%. The value .5 is 50%. The value 1.5 is 150% and so on. Use this formula to determine the scaling factor:
desired percentage * .01
- If you choose to scale the image to a specific dimension, the value you provide for the to size parameter is a single integer indicating the new value for longest dimension to be scaled (either height or width, whichever is longer).
Scaling by Percentage
Here are some script examples using each method. First, a script for scaling an image by percentage (%50):
![]()
set this_file to choose file without invisibles
try
tell application "Image Events"
-- start the Image Events application
launch
-- open the image file
set this_image to open this_file
-- perform action
scale this_image by factor 0.5
-- save the changes
save this_image with icon
-- purge the open image data
close this_image
end tell
on error error_message
display dialog error_message
end try
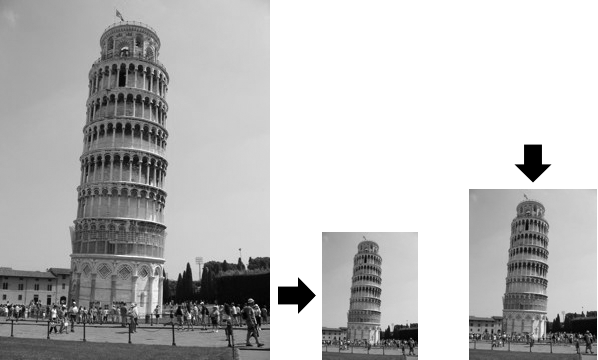
Scaling by percentage. (L to R) Normal, scaled to 50%, normal, scaled to 50%.
Scaling to Size
Scaling by percentage is a simple matter of entering the percentage factor as the value for the by factor parameter of the scale command. If you want to scale the image to a specific dimension, use the to size parameter.
The to size parameter only takes one value, namely the length to be assigned to the longest side of the image. If you want the longest side of an image to scaled to a specific length, then the script is straightforward as in this example where the image is proportionally scaled so that its longest side is 128 pixels in length:
![]()
set this_file to choose file without invisibles
set the target_length to 128
try
tell application "Image Events"
-- start the Image Events application
launch
-- open the image file
set this_image to open this_file
-- perform action
scale this_image to size target_length
-- save the changes
save this_image with icon
-- purge the open image data
close this_image
end tell
on error error_message
display dialog error_message
end try
However, if you want the shortest side of an image to be a specific length, then you'll have to add a calculation to the script to determine the new length for the longest side of the image, based on the current length of the shortest side of the image. Like this:
![]() A script for scaling an image so its shortest side is a desired value.
A script for scaling an image so its shortest side is a desired value.
set this_file to choose file without invisibles
set the target_length to 128
try
tell application "Image Events"
-- start the Image Events application
launch
-- open the image file
set this_image to open this_file
-- get dimensions of the image
copy dimensions of this_image to {W, H}
-- determine the shortest side and then
-- calculate the new length for the longer side
if W is less than H then
set the scale_length to (H * target_length) / W
set the scale_length to ¬
round scale_length rounding as taught in school
else
set the scale_length to (W * target_length) / H
set the scale_length to ¬
round scale_length rounding as taught in school
end if
-- perform action
scale this_image to size scale_length
-- save the changes
save this_image with icon
-- purge the open image data
close this_image
end tell
on error error_message
display dialog error_message
end try
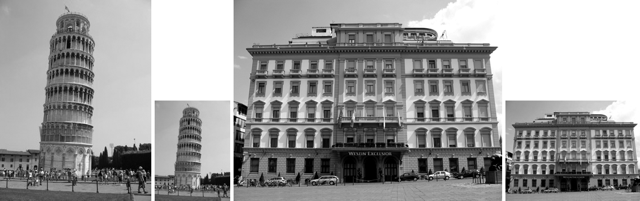
Scaling to size. (L to R) Normal, longest side scaled to 128 pixels, shortest side scaled to 128 pixels.
Note that the previous script used the value of the dimensions property of the image to determine the appropriate action to take. Scripts will often examine image properties like dimensions, color space, and file type to intelligently process them in workflows.
Also notice the use of the round command in the previous script example. It is used to deal with fractions of a pixel by rounding the values appropriately, or as the optional rounding parameter says: as taught in school
Examples Accepting User Input
![]() The following script will scale a chosen image to a user-specified percentage:
The following script will scale a chosen image to a user-specified percentage: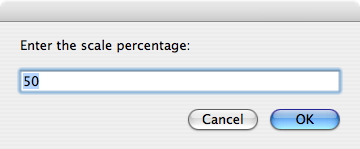
set this_file to choose file without invisibles
set the scale_percentage to 50
repeat
display dialog ¬
"Enter the scale percentage:" default answer scale_percentage
try
set the scale_percentage to ¬
the text returned of the result as number
if the scale_percentage is greater than 0 then
set the scale_factor to the scale_percentage * 0.01
exit repeat
else
error
end if
on error
beep
end try
end repeat
try
tell application "Image Events"
-- start the Image Events application
launch
-- open the image file
set this_image to open this_file
-- perform action
scale this_image by factor scale_factor
-- save the changes
save this_image with icon
-- purge the open image data
close this_image
end tell
on error error_message
display dialog error_message
end try
![]() If you want to scale a chosen image so that either its width or height is a specified length, the use the following script:
If you want to scale a chosen image so that either its width or height is a specified length, the use the following script:
set this_file to choose file without invisibles
set the target_length to 640
repeat
display dialog "Enter the target length " & ¬
"and choose the dimension of the " & ¬
"image to scale to the target length:" default answer ¬
target_length buttons {"Cancel", "Height", "Width"}
copy the result as list to {target_length, target_dimension}
try
set the target_length to the target_length as number
if the target_length is greater than 0 then
exit repeat
else
error
end if
on error
beep
end try
end repeat
try
tell application "Image Events"
-- start the Image Events application
launch
-- open the image file
set this_image to open this_file
-- get dimensions of the image
copy dimensions of this_image to {W, H}
-- determine scale length
if the target_dimension is "Height" then
if W is less than H then
set the scale_length to the target_length
else
set the scale_length to (W * target_length) / H
set the scale_length to ¬
round scale_length rounding as taught in school
end if
else -- target dimension is Width
if W is less than H then
set the scale_length to (H * target_length) / W
set the scale_length to ¬
round scale_length rounding as taught in school
else
set the scale_length to the target_length
end if
end if
-- perform action
scale this_image to size scale_length
-- save the changes
save this_image with icon
-- purge the open image data
close this_image
end tell
on error error_message
display dialog error_message
end try