Padding an Image
From the Image Events scripting dictionary:
pad v : Pad an image
pad (reference) : the object for the command
to dimensions (list) : the width and height of the new image, respectively, in pixels, as a pair of integers
[with pad color list] : the RGB color values with which to pad the new image, such as {65535, 0, 0} for red. The default color is black: {0, 0, 0}
Padding an image will add black space around the image to the dimensions provided in the script command. It is similar in function to growing or shrinking the image canvas in Adobe Photoshop. Padding is often used to put a border around images or every image in a group of images the same size, regardless of their origininal orientation.
The pad command takes a list of two integers for the to dimensions parameter: the new width (in pixels) for the image, and the new height for the image. Here's an example:
![]()
set this_file to choose file without invisibles
try
tell application "Image Events"
-- start the Image Events application
launch
-- open the image file
set this_image to open this_file
-- perform action
pad this_image to dimensions {640, 480}
-- save the changes
save this_image with icon
-- purge the open image data
close this_image
end tell
on error error_message
display dialog error_message
end try
The result of the pad command depends upon the dimensions of the image in relation to the dimensions of the pad area. If the image dimensions are smaller than the pad area, the image will be surrounded by an area of black pixels. If the image dimensions are larger than the pad area, then the image will be cropped to match the pad area.
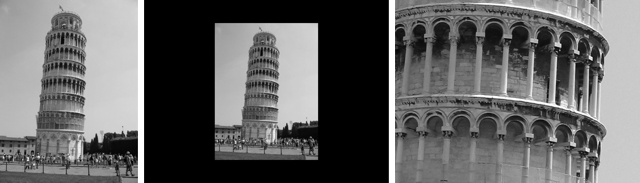
Use of the pad command. (L to R) Normal, image is smaller than the indicated pad area, image is larger than the indicated pad area.
There are three approaches preventing an image from being cropped during a pad:
- Don't alter the current image dimensions and add pad area based on the indicated pad proportions (aspect ratio), such as 4 x 3 or 16 x 9
- Use the current image dimensions as the starting point for determining and adding a pad area, and then scale the padded image to fit the desired image size
- Use the scale command to resize the image to fit within the desired pad dimensions and then add padding.
The first method uses the current image dimensions and provided pad area proportions to calculate and apply the padding. Here's a script demonstrating this technique by padding images to letterbox (16 x 9) format:
![]() A script for padding an image based on provided final proportions for the padded image:
A script for padding an image based on provided final proportions for the padded image:
set this_file to choose file without invisibles
-- indicate the proportions for the pad area
set H_proportion to 16
set V_proportion to 9
try
tell application "Image Events"
-- start the Image Events application
launch
-- open the image file
set this_image to open this_file
-- get dimensions of the image
copy dimensions of this_image to {W, H}
-- calculate pad dimensions
if H_proportion is greater than V_proportion then
set the new_W to (H * H_proportion) / V_proportion
set pad_dimensions to {new_W, H}
else
set the new_H to (W * V_proportion) / H_proportion
set pad_dimensions to {W, new_H}
end if
-- perform action
pad this_image to dimensions pad_dimensions
-- save the changes
save this_image with icon
-- purge the open image data
close this_image
end tell
on error error_message
display dialog error_message
end try

Use of the pad command to pad images to a 16:9 ratio. (L to R) vertical 3:4 image, horizontal 4:3 image, square 1:1 image.
The second padding method uses the current dimensions of the image, and the proportions of the provided target pad dimensions, as the basis for determining the pad area. Once the image has been padded proportionally, it is scaled to fit the target padding dimensions.
![]() A script for padding an image based on provided final dimensions of the padded image.:
A script for padding an image based on provided final dimensions of the padded image.:
set this_file to choose file without invisibles
-- indicate the final dimensions for the padded image
set target_W to 960
set target_H to 540
try
tell application "Image Events"
-- start the Image Events application
launch
-- open the image file
set this_image to open this_file
-- get dimensions of the image
copy dimensions of this_image to {W, H}
-- calculate pad dimensions
if target_W is greater than target_H then
set the new_W to (H * target_W) / target_H
set pad_dimensions to {new_W, H}
set the scale_dimension to target_W
else
set the new_H to (W * target_H) / target_W
set pad_dimensions to {W, new_H}
set the scale_dimension to target_H
end if
-- perform action
pad this_image to dimensions pad_dimensions
-- save the changes
save this_image with icon
-- perform action
scale this_image to size scale_dimension
-- save the changes
save this_image with icon
-- purge the open image data
close this_image
end tell
on error error_message
display dialog error_message
end try
Note that in the previous script, the image is saved twice: once after the padding has been applied, and once after the scaling has been applied. This is necessary when a scale procedure follows a padding procedure.
The third padding method begins by scaling the image to fit within the target pad area and then adds the padding to the scaled image.
![]() A script for padding an image based on provided final dimensions of the padded image.
A script for padding an image based on provided final dimensions of the padded image.
set this_file to choose file without invisibles
-- indicate the final dimensions for the padded image
set target_W to 960
set target_H to 540
try
tell application "Image Events"
-- start the Image Events application
launch
-- open the image file
set this_image to open this_file
-- get dimensions of the image
copy dimensions of this_image to {W, H}
-- calculate scaling
if target_W is greater than target_H then
if W is greater than H then
set the scale_length to (W * target_H) / H
set the scale_length to ¬
round scale_length rounding as taught in school
else
set the scale_length to target_H
end if
else if target_H is greater than target_W then
if H is greater than W then
set the scale_length to (H * target_W) / W
set the scale_length to ¬
round scale_length rounding as taught in school
else
set the scale_length to target_W
end if
else -- square pad area
set the scale_length to target_H
end if
-- perform action
scale this_image to size scale_length
-- perform action
pad this_image to dimensions {target_W, target_H}
-- save the changes
save this_image with icon
-- purge the open image data
close this_image
end tell
on error error_message
display dialog error_message
end try
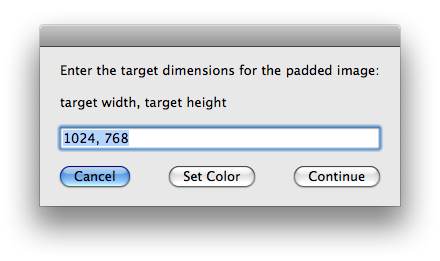
Example Accepting User Input
![]() A script that allows the user to input the target width and height for the chosen image. The image will be scaled and padded to the fit the input dimensions.
A script that allows the user to input the target width and height for the chosen image. The image will be scaled and padded to the fit the input dimensions.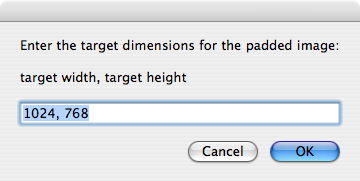
property target_dimensions : "1024, 768"
set this_file to choose file without invisibles
-- get the final dimensions for the padded image
repeat
display dialog "Enter the target dimensions for the padded image:" & ¬
return & return & ¬
"target width, target height" default answer target_dimensions
set the dimensions_string to the text returned of the result
try
if the dimensions_string does not contain "," then error
set AppleScript's text item delimiters to ","
copy every text item of ¬
the dimensions_string to {width_string, height_string}
set AppleScript's text item delimiters to ""
set target_W to width_string as integer
set target_H to height_string as integer
if target_W is less than 1 then error
if target_H is less than 1 then error
set the target_dimensions to ¬
(target_W & ", " & target_H) as string
exit repeat
on error
beep
end try
end repeat
try
tell application "Image Events"
-- start the Image Events application
launch
-- open the image file
set this_image to open this_file
-- get dimensions of the image
copy dimensions of this_image to {W, H}
-- calculate scaling
if target_W is greater than target_H then
if W is greater than H then
set the scale_length to (W * target_H) / H
set the scale_length to ¬
round scale_length rounding as taught in school
else
set the scale_length to target_H
end if
else if target_H is greater than target_W then
if H is greater than W then
set the scale_length to (H * target_W) / W
set the scale_length to ¬
round scale_length rounding as taught in school
else
set the scale_length to target_W
end if
else -- square pad area
set the scale_length to target_H
end if
-- perform action
scale this_image to size scale_length
-- perform action
pad this_image to dimensions {target_W, target_H}
-- save the changes
save this_image with icon
-- purge the open image data
close this_image
end tell
on error error_message
display dialog error_message
end try
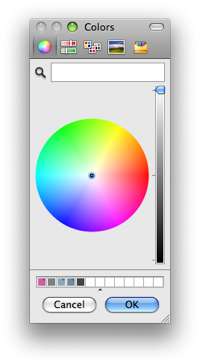
![]() Click the Script Editor icon for a version of the previous script that incorporates the with pad color parameter and the choose color command to allow the user to pick the color for the image pad.
Click the Script Editor icon for a version of the previous script that incorporates the with pad color parameter and the choose color command to allow the user to pick the color for the image pad.