Framing an Image
An interesting use of the pad command is to create a border around images. Padding an image will add black space around the image to the dimensions provided in the script command. It is similar in function to growing or shrinking the image canvas in Adobe Photoshop. Padding is often used to put a border around images or every image in a group of images the same size, regardless of their original orientation.
This can be done by indicating the thickness of the border in pixels or as a percentage of the overall size of the image.
Frame Thickness in Pixels
The following script will add a frame, whose width is the indicated number of pixels, around an image. Note that the thickness of the frame on each side of the image is the indicated number of pixels. If you want to add a frame that increases the width or height of the image by only 12 pixels, use half that amount, 6 pixels, as the value for the frame_TH variable.
![]() A script for adding a border of a specified number of pixels to an image.
A script for adding a border of a specified number of pixels to an image.
set this_file to choose file without invisibles
set the frame_TH to 12
try
tell application "Image Events"
-- start the Image Events application
launch
-- open the image file
set this_image to open this_file
-- get dimensions of the image
copy dimensions of this_image to {W, H}
-- perform action
pad this_image ¬
to dimensions {W + frame_TH, H + frame_TH}
-- save the changes
save this_image with icon
-- purge the open image data
close this_image
end tell
on error error_message
display dialog error_message
end try
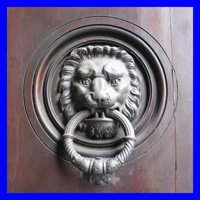
Use of the pad command to add a frame whose thickness is fixed number of pixels.
Frame Thickness in Points
Note that the "visual thickness" of the image border is dependent on the resolution of the image itself. A border of 12 pixels will appear thicker on an image whose resolution is 72 DPI (dots per inch) than an image whose resolution is 300 DPI.
To get a border whose thickness is a specific number of points, add a calculation to the script that multiplies the desired border thickness (in points) times the resolution of the image divided by the number of points per inch you want to use:
To get a border whose thickness is a specific number of points, add a calculation to the script that divides the resolution of the image by the number of points in an inch (usually 72), and then multiply the result times the number of points you want the frame thickness to be.
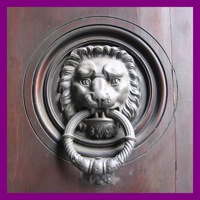
![]() A script for adding a border whose thickness in specified in points, not picels.
A script for adding a border whose thickness in specified in points, not picels.
property points_per_inch : 72
set this_file to choose file without invisibles
set the frame_TH to 12 -- points, NOT pixels
try
tell application "Image Events"
-- start the Image Events application
launch
-- open the image file
set this_image to open this_file
-- get resolution of the image
copy resolution of this_image to {X_res, Y_res}
-- calculate the frame thickness based on points per inch
set pixels_per_point to X_res / points_per_inch
set the frame_TH to frame_TH * pixels_per_point
set the frame_TH to ¬
round frame_TH rounding as taught in school
-- get dimensions of the image
copy dimensions of this_image to {W, H}
-- perform action
pad this_image to dimensions ¬
{W + frame_TH, H + frame_TH}
-- save the changes
save this_image with icon
-- purge the open image data
close this_image
end tell
on error error_message
display dialog error_message
end try
Frame Thickness as Percentage
The second method of determing border size is by percentage. Using this method, the frame thickness will vary for each image, depending on its size and resolution.
The following script will add a frame, whose width is a percentage of the overall size of the image based on the length of the distance between the opposing ends of the image.
![]() A script for adding a border whose thickness is a percentage of the overall size of the image.
A script for adding a border whose thickness is a percentage of the overall size of the image.
set this_file to choose file without invisibles
set the TH_factor to 0.05 -- 5%
try
tell application "Image Events"
-- start the Image Events application
launch
-- open the image file
set this_image to open this_file
-- get dimensions of the image
copy dimensions of this_image to {W, H}
-- determine the length of the hypotenuse
set the HY_length to ((W ^ 2) + (H ^ 2)) ^ 0.5
-- determine the frame thickness
set frame_TH to HY_length * TH_factor
-- perform action
pad this_image ¬
to dimensions {W + frame_TH, H + frame_TH}
-- save the changes
save this_image with icon
-- purge the open image data
close this_image
end tell
on error error_message
display dialog error_message
end try
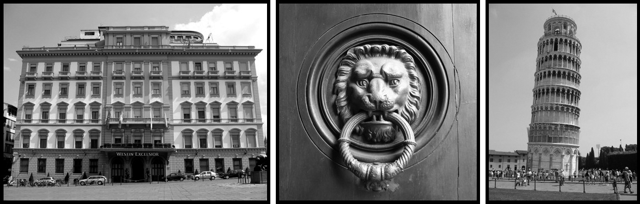
Use of the pad command to add a frame whose thickness is based on a percentage of their overall size. Note that the height of each image (excluding the thickness of the frame) is the same. The frame thickness of each image varies because the size of the images vary.